1. 도구 소개
Containerlab
Containerlab은 컨테이너 기반 네트워크 토폴로지를 YAML 파일 하나로 정의하고 실행할 수 있는 오픈소스 도구입니다. 물리 장비나 무거운 VM 없이도 실제 라우팅 프로토콜을 실험할 수 있습니다.
bash -c "$(curl -sL https://get.containerlab.dev)"토폴로지는 .clab.yml 파일로 정의합니다. 노드 종류(kind), 이미지, 링크를 선언하면 containerlab deploy 한 줄로 컨테이너 네트워크가 올라옵니다.
FRRouting (FRR)
FRR은 Quagga 포크에서 출발한 오픈소스 라우팅 스위트입니다. OSPF, BGP, IS-IS, MPLS 등을 지원하며, Cisco IOS와 유사한 CLI(vtysh)를 제공합니다.
2. 실습 토폴로지
5대의 라우터로 구성합니다. R1·R2·R3는 OSPF 단일 AS(65001) 내부에서 삼각형으로 연결되어 멀티패스를 형성합니다. R3는 ASBR(AS Border Router)로 eBGP를 통해 R4(AS65002)와 연결되고, R4는 다시 R5(AS65003)와 eBGP 피어링합니다.
flowchart LR
  subgraph as1["AS65001 — OSPF"]
    R1
    R2
    R3
    R1 --- R2
    R1 --- R3
    R2 --- R3
  end
  subgraph as2["AS65002"]
    R4
  end
  subgraph as3["AS65003"]
    R5
  end

  R3 -->|eBGP| R4
  R4 -->|eBGP| R5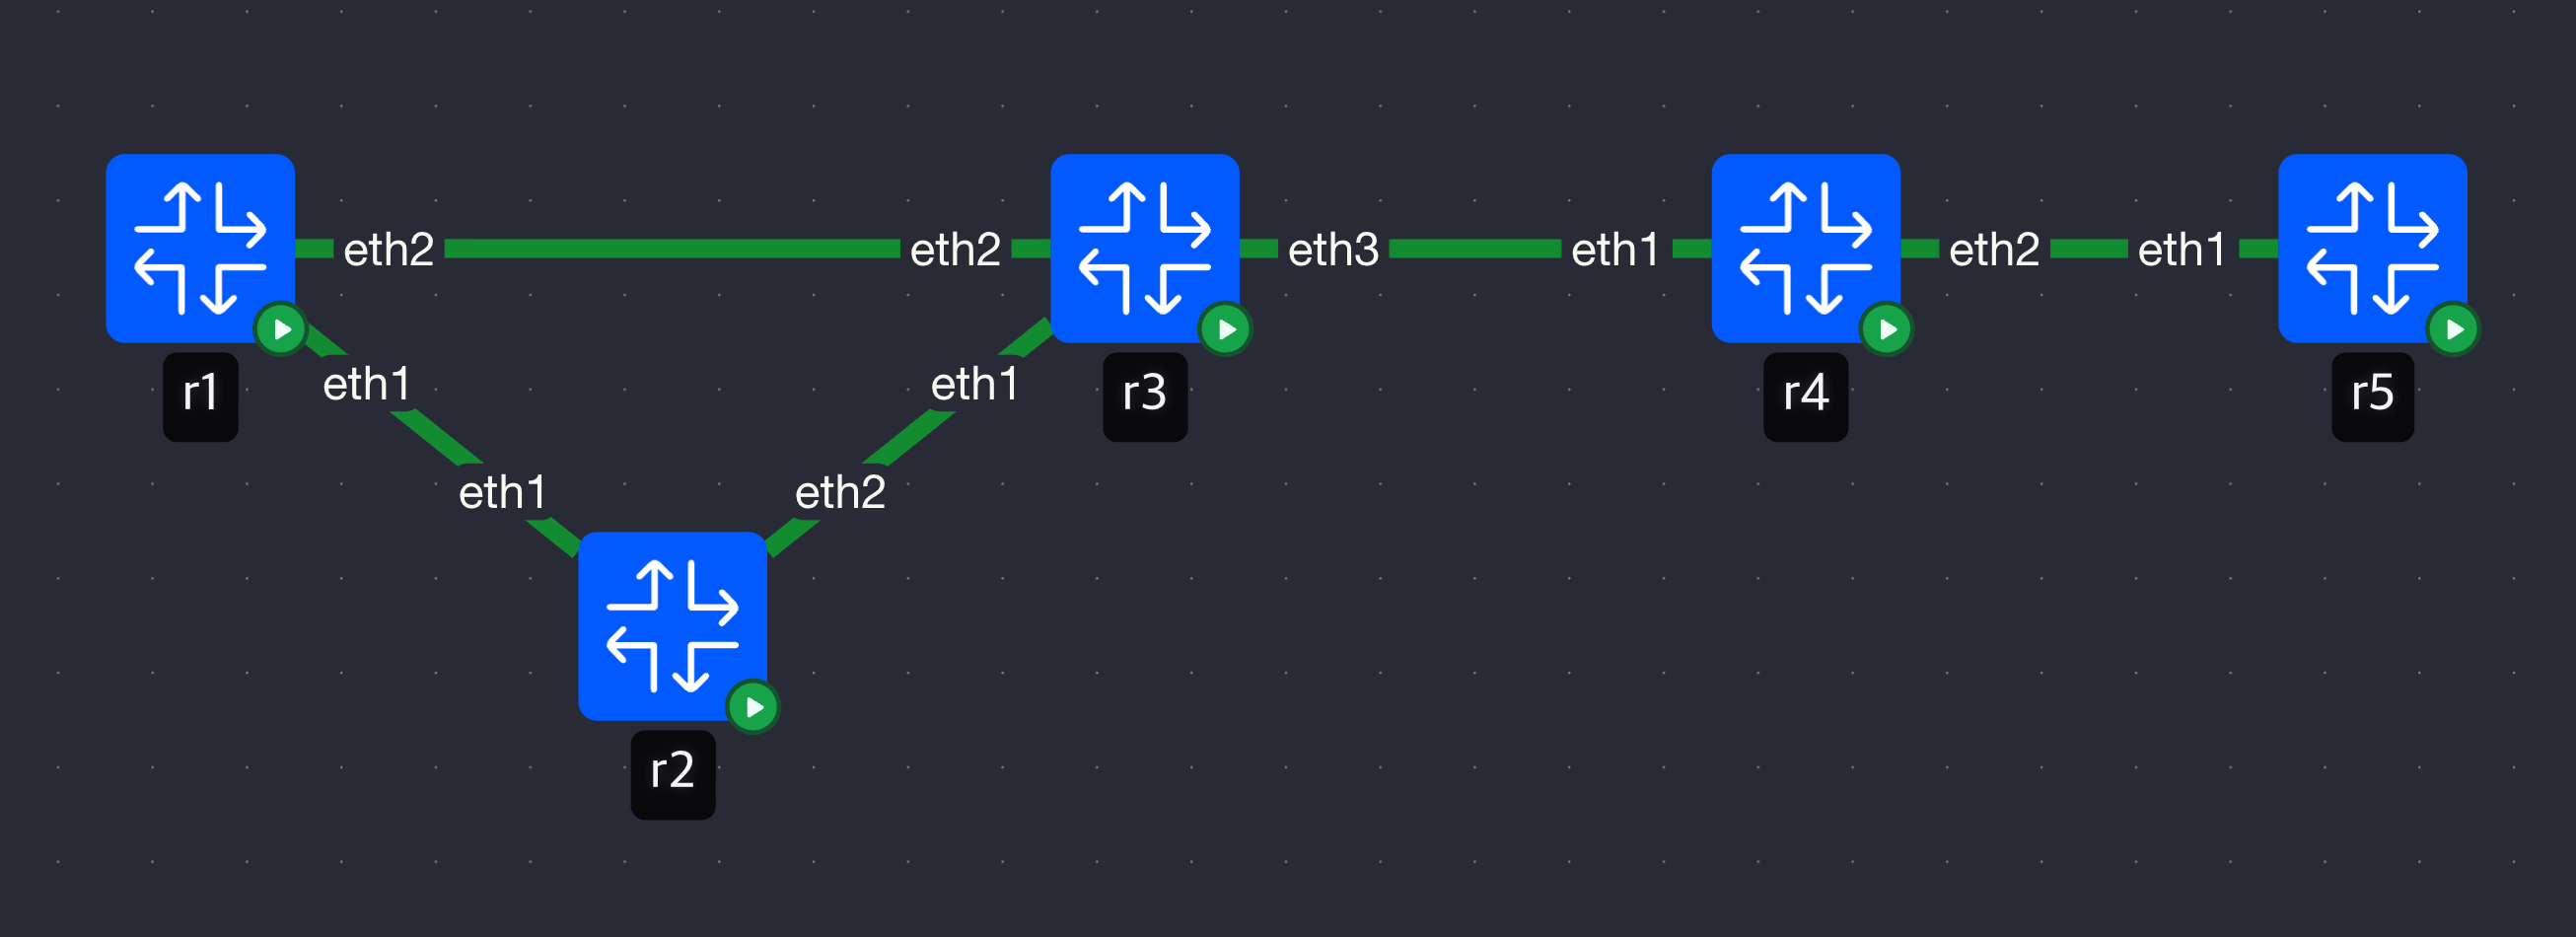
| 라우터 | AS | 역할 | 루프백 |
|---|---|---|---|
| R1 | 65001 | OSPF 내부 | 10.0.1.1/32 |
| R2 | 65001 | OSPF 내부 | 10.0.2.1/32 |
| R3 | 65001 | OSPF + eBGP ASBR | 10.0.3.1/32 |
| R4 | 65002 | eBGP 중간 AS | 10.0.4.1/32 |
| R5 | 65003 | eBGP 말단 | 10.0.5.1/32 |
링크 주소:
| 링크 | 서브넷 |
|---|---|
| R1 ↔ R2 | 192.168.12.0/30 |
| R2 ↔ R3 | 192.168.23.0/30 |
| R1 ↔ R3 | 192.168.13.0/30 |
| R3 ↔ R4 | 192.168.34.0/30 |
| R4 ↔ R5 | 192.168.45.0/30 |
검증 목표:
- R1 루프백이 OSPF를 통해 R3까지 전달됩니다.
- R3가 OSPF 경로를 BGP로 재분배해 R4 → R5로 전파합니다.
- R5에서 AS_PATH가
65002 65001로 쌓이는 것을 확인합니다. - R1에서 R3로 가는 경로가 OSPF ECMP로 두 갈래 존재하는지 확인합니다.
3. 파일 구성
lab/
├── lab.clab.yml
├── r1/frr.conf
├── r2/frr.conf
├── r3/frr.conf
├── r4/frr.conf
└── r5/frr.conf
lab.clab.yml
name: ospf-bgp-lab

mgmt:
  network: clab-mgmt
  ipv4-subnet: 10.10.10.0/24

topology:
  nodes:
    r1:
      kind: linux
      image: quay.io/frrouting/frr:10.2.1
      binds:
        - r1/frr.conf:/etc/frr/frr.conf
        - r1/daemons:/etc/frr/daemons
    r2:
      kind: linux
      image: quay.io/frrouting/frr:10.2.1
      binds:
        - r2/frr.conf:/etc/frr/frr.conf
        - r2/daemons:/etc/frr/daemons
    r3:
      kind: linux
      image: quay.io/frrouting/frr:10.2.1
      binds:
        - r3/frr.conf:/etc/frr/frr.conf
        - r3/daemons:/etc/frr/daemons
    r4:
      kind: linux
      image: quay.io/frrouting/frr:10.2.1
      binds:
        - r4/frr.conf:/etc/frr/frr.conf
        - r4/daemons:/etc/frr/daemons
    r5:
      kind: linux
      image: quay.io/frrouting/frr:10.2.1
      binds:
        - r5/frr.conf:/etc/frr/frr.conf
        - r5/daemons:/etc/frr/daemons
  links:
    - endpoints: ["r1:eth1", "r2:eth1"]   # R1-R2
    - endpoints: ["r2:eth2", "r3:eth1"]   # R2-R3
    - endpoints: ["r1:eth2", "r3:eth2"]   # R1-R3 (ECMP)
    - endpoints: ["r3:eth3", "r4:eth1"]   # R3-R4 eBGP
    - endpoints: ["r4:eth2", "r5:eth1"]   # R4-R5 eBGP
daemons 파일은 FRR에서 어떤 데몬을 실행할지 지정합니다. 이 파일이 없으면 OSPF·BGP 데몬이 시작되지 않습니다. R1·R2는 ospfd=yes, R4·R5는 bgpd=yes, R3는 둘 다 활성화합니다.
r1/frr.conf
frr version 10.2.1
frr defaults traditional
hostname r1

interface lo
 ip address 10.0.1.1/32
!
interface eth1
 ip address 192.168.12.1/30
!
interface eth2
 ip address 192.168.13.1/30
!

router ospf
 ospf router-id 10.0.1.1
 network 10.0.1.1/32 area 0
 network 192.168.12.0/30 area 0
 network 192.168.13.0/30 area 0
!
r2/frr.conf
frr version 10.2.1
frr defaults traditional
hostname r2

interface lo
 ip address 10.0.2.1/32
!
interface eth1
 ip address 192.168.12.2/30
!
interface eth2
 ip address 192.168.23.1/30
!

router ospf
 ospf router-id 10.0.2.1
 network 10.0.2.1/32 area 0
 network 192.168.12.0/30 area 0
 network 192.168.23.0/30 area 0
!
r3/frr.conf
R3는 OSPF와 BGP를 모두 실행하는 ASBR입니다. OSPF 경로를 BGP로 재분배합니다.
frr version 10.2.1
frr defaults traditional
hostname r3

interface lo
 ip address 10.0.3.1/32
!
interface eth1
 ip address 192.168.23.2/30
!
interface eth2
 ip address 192.168.13.2/30
!
interface eth3
 ip address 192.168.34.1/30
!

router ospf
 ospf router-id 10.0.3.1
 network 10.0.3.1/32 area 0
 network 192.168.23.0/30 area 0
 network 192.168.13.0/30 area 0
!

router bgp 65001
 bgp router-id 10.0.3.1
 neighbor 192.168.34.2 remote-as 65002

 address-family ipv4 unicast
  redistribute ospf
  neighbor 192.168.34.2 activate
 exit-address-family
!
r4/frr.conf
R4는 R3(AS65001)와 R5(AS65003) 사이의 중간 AS입니다. 수신한 BGP 경로를 R5로 그대로 전달합니다.
frr version 10.2.1
frr defaults traditional
hostname r4

interface lo
 ip address 10.0.4.1/32
!
interface eth1
 ip address 192.168.34.2/30
!
interface eth2
 ip address 192.168.45.1/30
!

router bgp 65002
 bgp router-id 10.0.4.1
 neighbor 192.168.34.1 remote-as 65001
 neighbor 192.168.45.2 remote-as 65003

 address-family ipv4 unicast
  neighbor 192.168.34.1 activate
  neighbor 192.168.45.2 activate
 exit-address-family
!
r5/frr.conf
frr version 10.2.1
frr defaults traditional
hostname r5

interface lo
 ip address 10.0.5.1/32
!
interface eth1
 ip address 192.168.45.2/30
!

router bgp 65003
 bgp router-id 10.0.5.1
 neighbor 192.168.45.1 remote-as 65002

 address-family ipv4 unicast
  neighbor 192.168.45.1 activate
 exit-address-family
!
4. 배포 및 검증
토폴로지 시작
cd lab/
containerlab deploy -t lab.clab.yml
OSPF ECMP 확인 — R1에서
R1에서 R3(10.0.3.1)로 가는 경로를 확인합니다. 직접 링크(eth2)와 R2 경유(eth1) 두 경로가 ECMP로 설치되어야 합니다.
docker exec -it clab-ospf-bgp-lab-r1 vtysh -c "show ip route 10.0.3.1"Routing entry for 10.0.3.1/32
Known via "ospf", distance 110, metric 20, best
* 192.168.12.2, via eth1, weight 1
* 192.168.13.2, via eth2, weight 1
두 넥스트홉이 모두 *로 표시됩니다. OSPF가 동일 Cost 경로를 ECMP로 설치한 것입니다. 트래픽은 두 경로로 분산됩니다.
OSPF 인접 관계 확인 — R3에서
docker exec -it clab-ospf-bgp-lab-r3 vtysh -c "show ip ospf neighbor"Neighbor ID Pri State Dead Time Address Interface
10.0.1.1 1 Full/Backup 35.102s 192.168.13.1 eth2:192.168.13.2
10.0.2.1 1 Full/DR 34.891s 192.168.23.1 eth1:192.168.23.2
R1, R2 모두 Full 상태입니다. OSPF는 Hello 패킷을 주고받아 인접 관계를 맺고, LSA(Link State Advertisement)를 플러딩해 전체 토폴로지 DB를 동기화합니다.
OSPF 패킷 캡처
VS Code의 Containerlab 확장에서 Edgeshark를 통해 Wireshark로 패킷을 캡처했습니다. R1의 eth1 인터페이스에서 캡처한 패킷입니다.

R1(192.168.12.1)과 R2(192.168.12.2)가 224.0.0.5(OSPF 멀티캐스트)로 Hello를 주고받습니다. R1 재시작 후 인접 관계를 재수립하는 과정을 캡처하면 DB Description → LS Request → LS Update 순서로 올라옵니다.
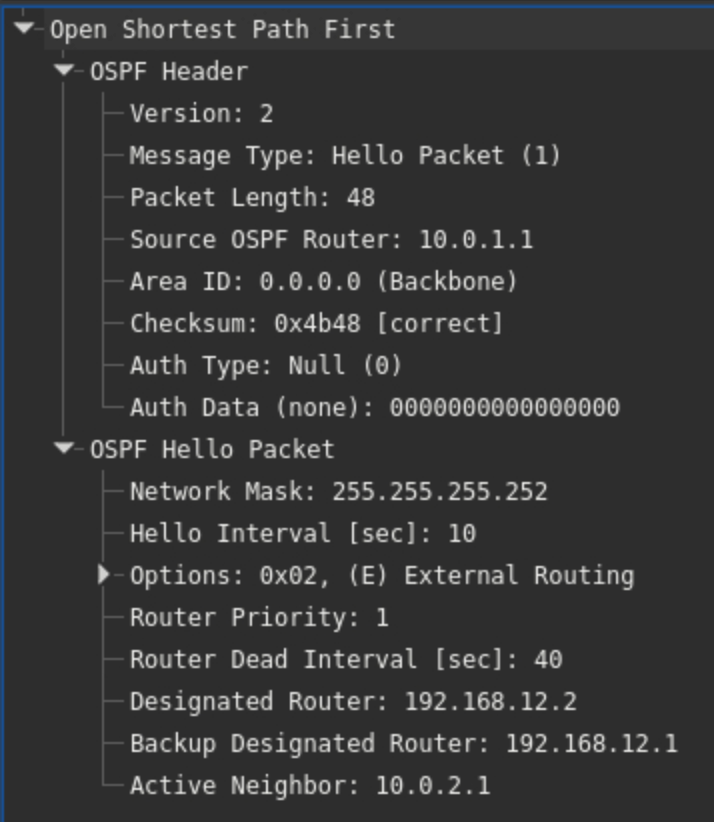
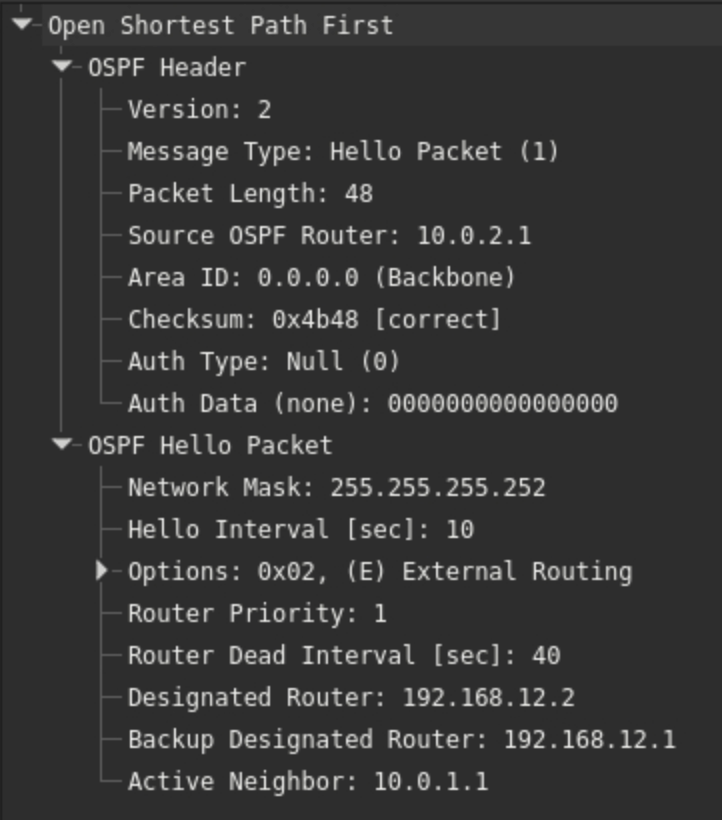
224.0.0.6은 DR(Designated Router)에게만 보내는 멀티캐스트 주소입니다. LS Update 패킷 안에는 Router-LSA(Type 1)와 Network-LSA(Type 2)가 담겨 있으며, 이것이 OSPF가 공유하는 링크 상태 정보입니다.
BGP 테이블 확인 — R5에서
docker exec -it clab-ospf-bgp-lab-r5 vtysh -c "show bgp ipv4 unicast"BGP table version is 6, local router ID is 10.0.5.1
Status codes: s suppressed, d damped, h history, * valid, > best
Origin codes: i - IGP, e - EGP, ? - incomplete
Network Next Hop Metric LocPref Weight Path
*> 10.0.1.1/32 192.168.45.1 0 0 65002 65001 ?
*> 10.0.2.1/32 192.168.45.1 0 0 65002 65001 ?
*> 10.0.3.1/32 192.168.45.1 0 0 65002 65001 ?
*> 192.168.12.0/30 192.168.45.1 0 0 65002 65001 ?
*> 192.168.13.0/30 192.168.45.1 0 0 65002 65001 ?
*> 192.168.23.0/30 192.168.45.1 0 0 65002 65001 ?
AS_PATH가 65002 65001로 쌓여 있습니다. R5 → R4(65002) → R3(65001) 순으로 경로가 전파된 것입니다. BGP는 AS_PATH 루프 감지에 이 속성을 사용하며, 자신의 AS 번호가 포함된 경로는 수신하지 않습니다.
BGP 패킷 캡처
R3의 eth3 인터페이스에서 캡처한 패킷입니다. vtysh -c "clear bgp *"로 세션을 리셋하면 전체 수립 과정이 올라옵니다.
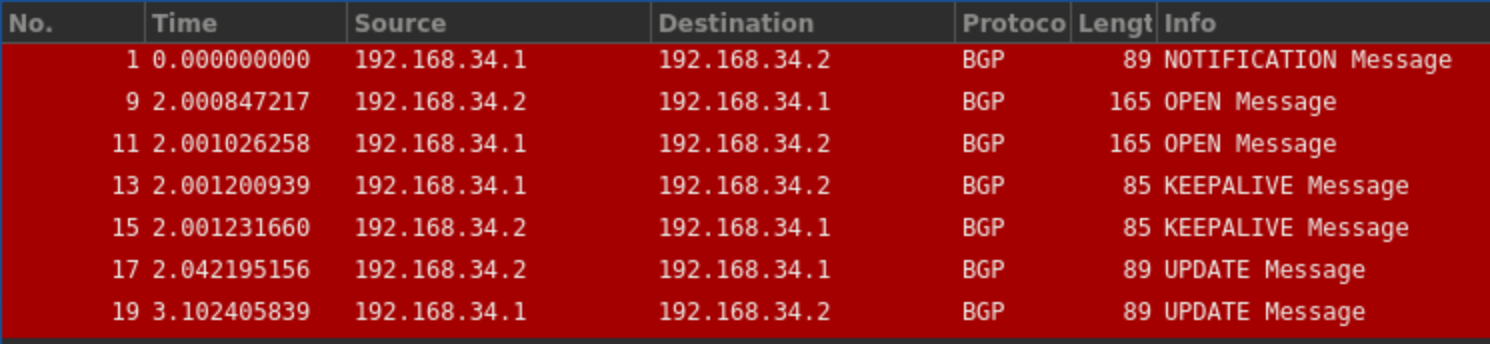
NOTIFICATION으로 기존 세션을 끊고, OPEN → KEEPALIVE → UPDATE 순서로 재수립됩니다.
OPEN 패킷을 펼치면 각 라우터가 자신의 AS 번호를 선언하는 것을 확인할 수 있습니다.
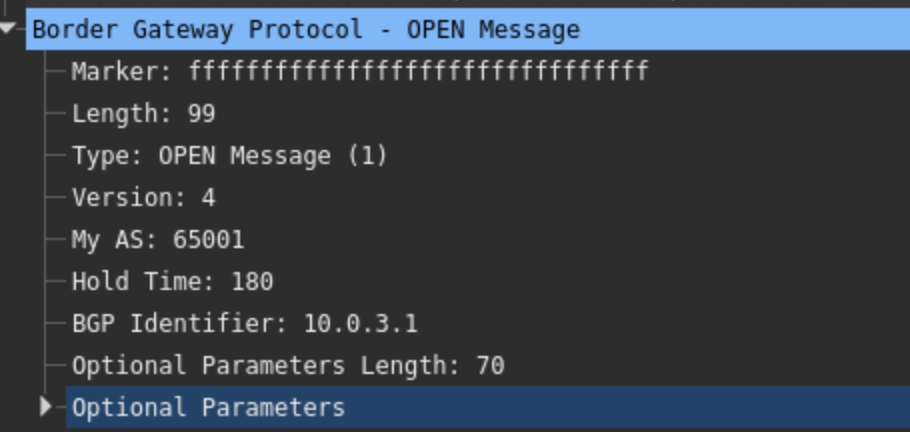
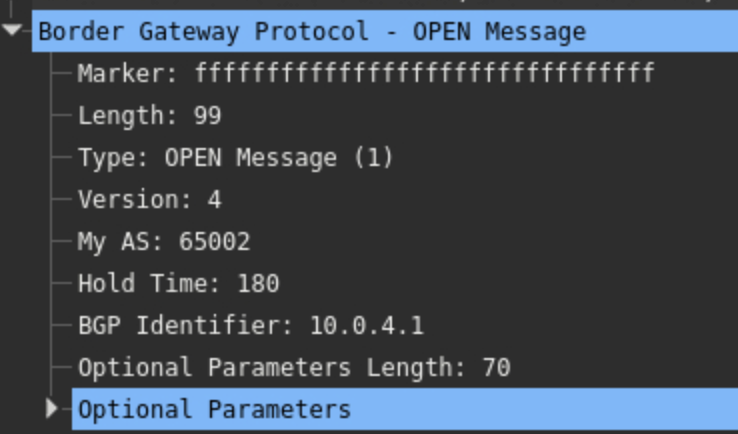
BGP Identifier는 라우터 ID로, R3는 10.0.3.1, R4는 10.0.4.1입니다. 서로 다른 AS 번호를 확인하고 eBGP 피어로 인식합니다.
엔드투엔드 도달성 확인
docker exec -it clab-ospf-bgp-lab-r5 ping 10.0.1.1 -c 3PING 10.0.1.1 (10.0.1.1): 56 data bytes
64 bytes from 10.0.1.1: seq=0 ttl=61 time=0.531 ms
64 bytes from 10.0.1.1: seq=1 ttl=61 time=0.498 ms
64 bytes from 10.0.1.1: seq=2 ttl=61 time=0.512 ms
R5(AS65003)에서 R1 루프백(AS65001)까지 3홉(R5 → R4 → R3 → R1)으로 도달합니다.
5. OSPF와 BGP의 역할 분리
이번 실습에서 두 프로토콜의 역할이 명확히 드러납니다.
OSPF (IGP)
- AS 내부 링크 상태를 전체 라우터에 공유합니다.
- LSA 플러딩 → 동일 토폴로지 DB → Dijkstra SPF 계산 순서로 동작합니다.
- 동일 Cost 경로는 자동으로 ECMP로 설치됩니다.
BGP (EGP)
- AS 간 prefix와 AS_PATH 속성을 교환합니다.
- AS_PATH로 루프를 방지하고 경로 정책(route-map, filter)을 적용합니다.
- R3처럼 IGP와 BGP가 만나는 지점에서
redistribute로 경로를 주입합니다. 실제 운영에서는 route-map으로 재분배 범위를 제한하는 것이 일반적입니다.
6. 정리
containerlab destroy -t lab.clab.ymlContainerlab 덕분에 YAML 토폴로지 선언과 FRR 설정 파일 마운트만으로 5대 라우터 환경을 몇 초 안에 구성할 수 있었습니다. Git으로 버전 관리가 가능하고, 실습 후에는 destroy 한 줄로 깔끔하게 정리됩니다!
댓글